Homeowner Guide
How to change a UK plug & the fuse inside it
A BS 1363 three-pin plugtop is one of the safest domestic plugs in the world — but only when it's wired correctly and fitted with the right BS 1362 cartridge fuse. Here's how to do both, with a fully labelled diagram of what's inside.
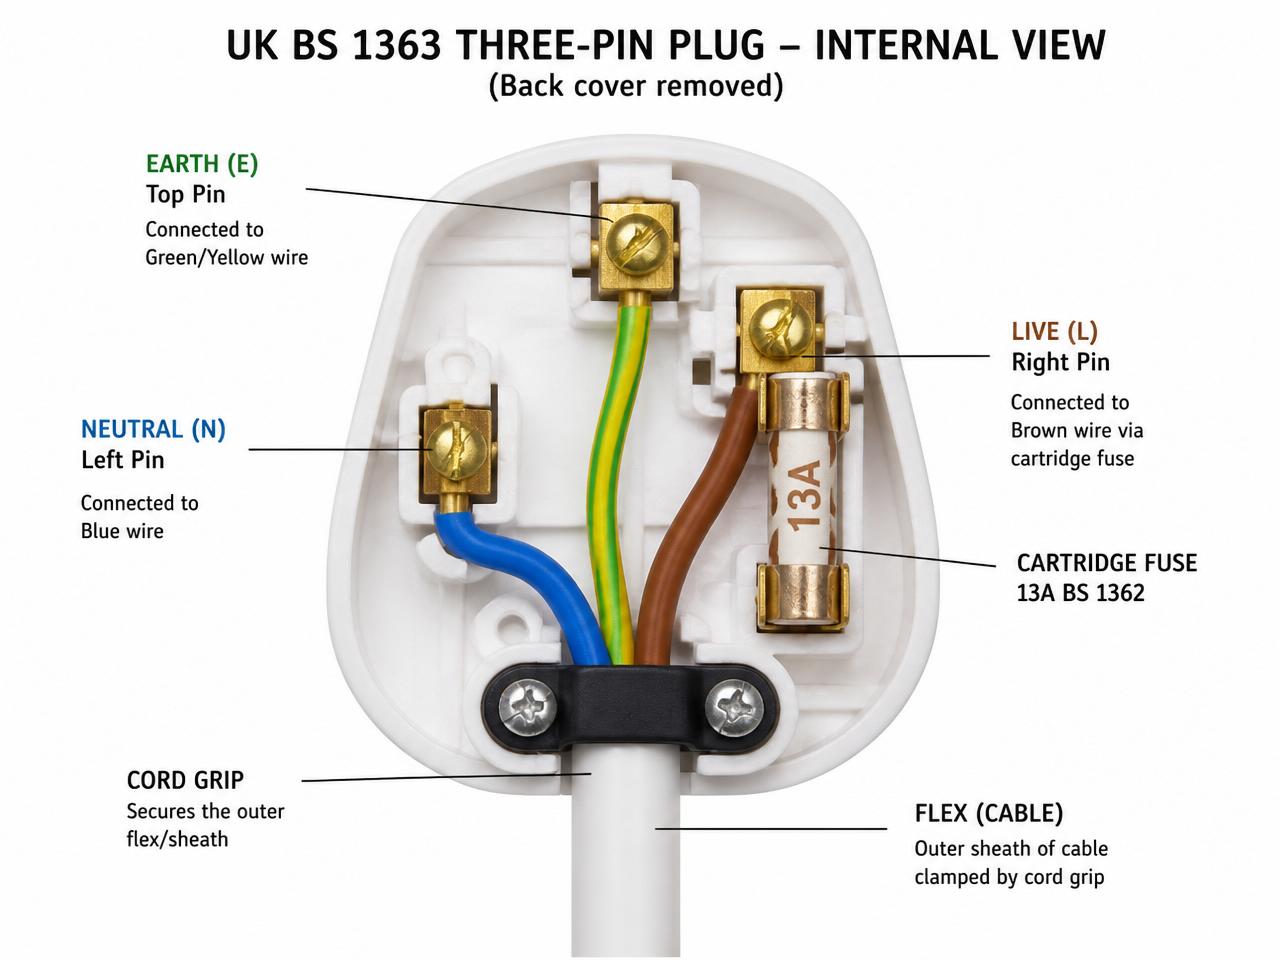
Inside a BS 1363 plugtop
Three pins, three colours, one fuse. Learn the layout and the rest is straightforward.
- Brown — Live goes to the right-hand pin via the cartridge fuse.
- Blue — Neutral goes to the left-hand pin.
- Green/Yellow — Earth goes to the top pin (always longest).
- Cord grip clamps the outer sheath, never the individual cores.
- BS 1362 cartridge fuse sits in two spring clips next to the live pin.
Step-by-step: wiring a new plug
Step 1
Unplug and prepare
Never work on a plug that's connected to the socket. Unplug at the wall first. You'll need a small flat screwdriver, a Phillips screwdriver, wire strippers and a new BS 1363 approved plugtop (look for the ASTA or BSI kitemark).
Step 2
Open the plug
Undo the large screw in the centre of the back and lift the cover off. Loosen (don't remove) the two cord-grip screws so the flex can slide through.
Step 3
Strip the flex
Strip about 40–50 mm of the outer sheath so the cord grip clamps the sheath — not the individual cores. Then strip about 5 mm of insulation from each core (brown, blue, green/yellow).
Step 4
Connect the cores to the correct pins
Brown (Live) → right-hand pin, via the cartridge fuse. Blue (Neutral) → left-hand pin. Green/Yellow (Earth) → top pin. Twist each core neatly, insert fully into the terminal and tighten firmly — no stray strands.
Step 5
Set the cores at the right length
The earth core is always slightly longer than the live and neutral, so if the flex is ever pulled the earth is the last connection to break. Route each core into its channel without crossing over.
Step 6
Tighten the cord grip
Position the outer sheath under the cord grip and tighten both screws evenly. Give the flex a gentle tug — it should not move. If individual cores are under the cord grip, start again.
Step 7
Fit the correct fuse
Fit a BS 1362 cartridge fuse rated for the appliance (see the guide below). Snap it firmly into both fuse clips.
Step 8
Refit the cover and test
Refit the back cover and tighten the centre screw. Inspect: no exposed copper, cores in the right pins, cord grip on the sheath. Plug in and switch on.
Changing the fuse in a plug
The fuse protects the flex and the appliance from a fault current. A blown fuse usually means the appliance has drawn too much current — most often because it's faulty.
Step 1
Unplug at the wall
Always remove the plug from the socket before touching the fuse.
Step 2
Access the fuse
Most modern BS 1363 plugs have a small fuse cover on the front — slide or lever it off with a flat screwdriver. Older or moulded plugs need the whole back cover removed by undoing the centre screw.
Step 3
Lever the old fuse out
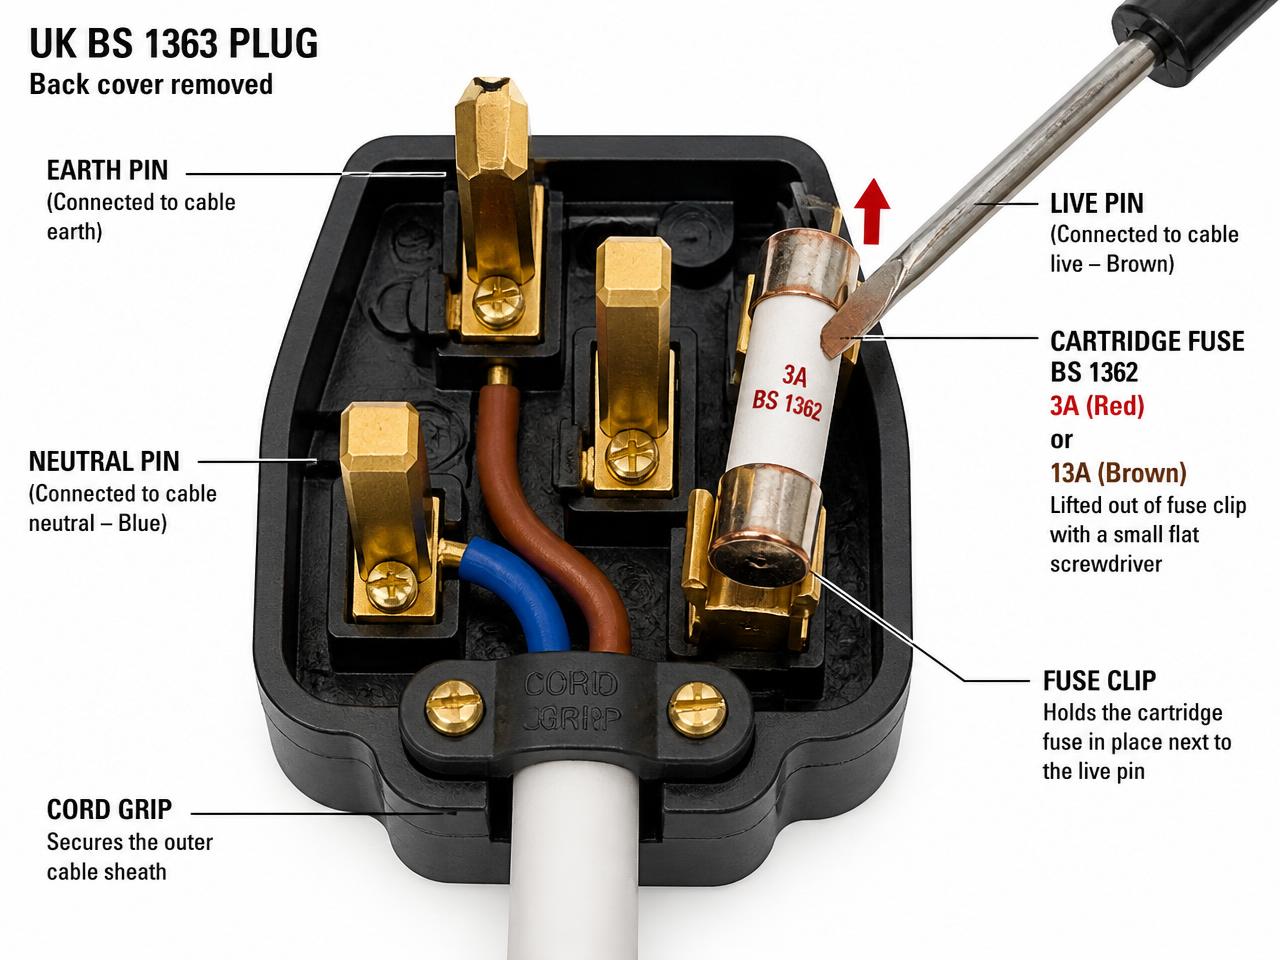
Slide a small flat-blade screwdriver under one end of the cartridge fuse and gently lift it out of the two fuse clips next to the live pin.
Step 4
Fit the correct replacement
Only use a BS 1362 approved cartridge fuse of the correct rating (3A, 5A or 13A). Snap it firmly back into both clips.
Step 5
Refit and test
Refit the cover, plug back in and switch on. If the new fuse blows straight away, the appliance or its flex has a fault — stop using it and have it checked.
Which fuse rating?
The fuse rating must match the appliance, not the socket. A 13A fuse in a lamp will not protect the flex if it's damaged. Always check the appliance rating plate — many now specify the fuse required.
| Fuse (BS 1362) | Typical use |
|---|---|
| 3A (red) | Appliances up to about 700 W — lamps, radios, TVs, clocks, laptops, phone chargers, most electronics. |
| 5A (black) | Occasionally specified for some older appliances or lighting flexes — check the appliance rating plate. |
| 13A (brown) | Appliances above about 700 W — kettles, toasters, irons, heaters, microwaves, vacuum cleaners, washing machines. |
Safety checks before you plug back in
- • No copper strands visible outside the terminals.
- • Each core in the correct pin — brown right, blue left, green/yellow top.
- • Cord grip clamps the outer sheath, not the individual cores.
- • Correct BS 1362 fuse fitted, firmly clipped in.
- • Back cover fully closed and centre screw tight.
- • Never use a nail, coin, foil or oversized fuse as a substitute — it removes the plug's protection and can cause a fire.
If the appliance keeps blowing fuses, stop using it and have it PAT tested or repaired — a repeatedly blowing fuse is a fault, not a coincidence.